Parabo Press | Review

Parabo Press | Review


I found the company Parabo Press through an add on instagram, chances are that you have seen an add for their services as well! I decided to check out their instagram page and thought that their concept was really interesting! They had a promotion going that allowed you to get 25 photos printed for free as long as you paid shipping, which worked out to $10 CAD in my case (as of May 2017 this promotion is still going). I thought that was a pretty good deal, so I talked to Jason and we decided to pick out 25 of our favorite holiday photos and get them printed through Parabo. The pictures are 4" x 4" - designed to imitate the squares of an Instagram photo, and they are printed on thick, card-stock like paper. They are not printed on photo paper, which is a nice change in comparison to the typical 4x6 photo stock prints you get with film. Overall, I really like the square format of the pictures, as well as the quality of the prints. The prints have a small white border, which I am indifferent to - I am not sure if you can chose to have the border or not, but either way, I don't mind it being there.


The packaging was a super nice touch, everything was beautifully wrapped and the attention to detail is very apparent. The package itself had a cute little pattern and the prints were enclosed in a 'bend proof' sack to ensure their quality. I appreciate this attention to detail and quality, as sometimes the mail can be rough on small packages like that. Another plus is that shipping was relatively quick! I believe we waited around 2 weeks, which may seem like a long time, but I'm sure a significant amount of that time was spent processing our order. Overall, we were happy with the delivery time.


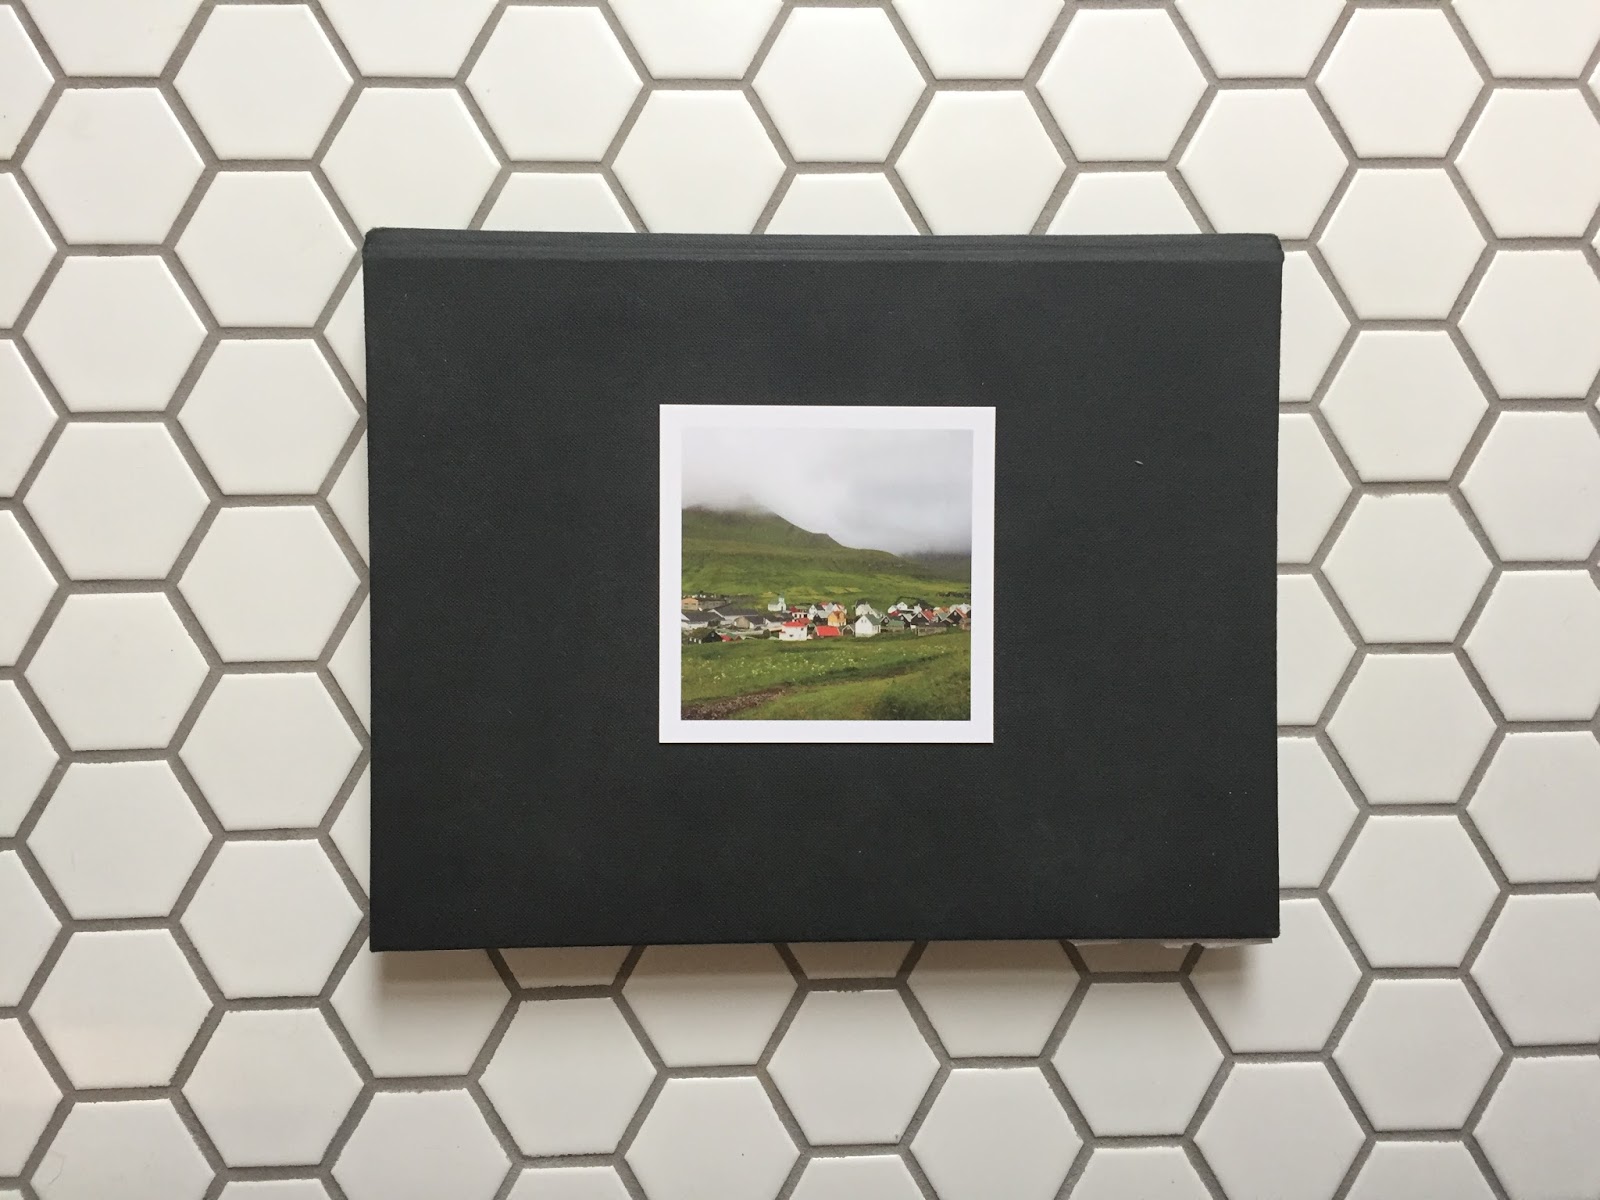
The quality of the image prints themselves is quite good for the price. The colours of the images are just as vibrant as they look digitally, so that is really nice. For the small size of the prints, the vibrancy is great, so I really enjoy that.

If you are looking to get square 'instagram - looking' prints, then I would definitely consider looking at Parabo press. Otherwise, for any other kind of print, I encourage you to do some research into other companies. While parabo is great, there are LOTS of printing companies out there, so it would be a good idea to compare prices and other things like quality, shipping costs, and other things. As for a cheap option though, Parabo is great!

If you want to see the full set of images - all 25, I have linked a youtube video which shows all of the pictures below!


Thanks so much for reading,
Madison xx

Pear & Goat Cheese Pizza

Pear & Goat Cheese Pizza


This Pear and Goat Cheese pizza has all of the delicious, delicate flavours that you look for in a gourmet pizza. There is the subtle flavour of the pear with the sharp saltiness from the prosciutto, both of which are complimented by the honey. The best part is getting a little hint of the tart goat cheese. Overall, this pizza is a great, light option for pizza night - bringing all of the delicious aspects of a pizza without the heaviness of gooey cheese and thick tomato sauce (both of which I definitely enjoy on occasion 😉).

I enjoyed this pizza with friends a few months ago and even though I just created it on the spot, I haven't stopped thinking about how yummy it was! I am all for sweet and savory together on pizza - (yes I am a pineapple on pizza kind of person 😋), so adding pears and honey to pizza seemed like a great idea!! 

To keep this pizza simple, there is no sauce, just simply some garlic olive oil (or plain olive oil, its up to you), and some honey drizzled on the dough. I am planning on adding my pizza dough recipe to the blog soon, so stay tuned for that! For now I recommend using Gemma Staffords pizza dough recipe, I have used it a few times and it has a really great flavour. 


Directions

First, preheat the oven to 425F, then stretch out your dough to the shape you desire. I usually oil a baking sheet and then put the stretched dough on top of that - the oil helps to crisp up the bottom of the crust. I always just use my hands and gravity to stretch my dough, but you can use a rolling pin if that works best for you! 

Once the dough is in place, drizzle some olive oil on top, either garlic or plain, and then drizzle honey on top of that. Feel free to rub the honey and oil into the dough, I like to do this to make sure it is spread evenly. Then I sprinkle a bit of coarse salt and add a crack of pepper around the pizza. 

After the base is done, add slices of pear around the pizza, it looks best in a circle design. Once there is pear all over the pizza, add the prosciutto. I usually rip it up into smaller pieces, as it can be hard to rip up with your teeth! Making it bite sized is a nice way to ensure a perfect bite each time! I usually just sprinkle the pieces of prosciutto over top of the pears and cover any holes with it. 

Now it is time for the goat cheese! I usually buy the herbed goat cheese, so I just take small dollops of that and place them evenly around the pizza. I don't like to crowd the pizza with the cheese, as it is only there to add a hint of tart to cut the sweet and salty. I prefer it to remain as a 'hint flavour' rather than a 'focus flavour'. 

The last step is to sprinkle dried rosemary and slivered almonds on top. The rosemary is for flavour, and the almonds are for texture! These are optional, but I think that they add a really nice touch to the overall flavour profile! At this point, you can also drizzle extra honey on top if you like! 

Bake it in the oven for 12-15 minutes - watch to see when the crust turns golden brown as that is when the pizza is done!


Pro-tip - simply remove the prosciutto to make this pizza a vegetarian option! With the tart flavour of the goats cheese, this pizza will still have a rounded flavour profile! In this case, you could also add parmiggiano-reggiano to bring another nutty, salty, element to the pizza. 

Let me know if you try this recipe, & be sure to come back for more!

Thanks for reading, 
Madison xx

Bullet Journal | May 2017

Bullet Journal | May 2017


Bullet journals have been on my mind for the past few months! In April, I decided to give the "bujo" system a trial run in a small homemade journal. I put a few sheets of white paper together and folded them - I secured the fold with a string and then went ahead and started the journal. I added in a legend, a monthly spread, a memories page, and then went right into the weekly spreads for the month of April. You can find a more detailed description of Aprils journal on my YouTube channel.

Long story short, I love the bullet journal system and decided to get a dotted journal by Leuchtturm 1917. The journal cost CAD 26 and so far, I do believe it is worth it! I love the thickness of the paper and the security of the cover and its elastic closure. Since this journal will be used every month from now on, I put a yearly spread at the beginning of this one, after the index and legend. The yearly spread is simply all of the months of the year illustrated in a chart like grid to give a full view of 2017. 


The legend is home to the different symbols which I use throughout my journal. I use a few of the proper "bujo" system symbols, like tasks and notes, but I have added things like emails and deadlines, important things, etc.. The symbols I use most are Tasks, Events, and Notes.


As for my monthly spread, I am trying to keep it kind-of simple. For the month of May, I have the days of the month in calendar form, as well as a goals section on the first page. Here I can highlight or circle important dates. This is a nice way to look at the month ahead and get a feel for timelines and things like that. My goals, as you can see, are pretty small at this point. I am trying out the Nike Fit app, so one goal is to complete a program this month. 

The next page has my memories. In the YouTube video on Aprils journal I express how I am not so sure about continuing the monthly memories drawings, so I am trying out a simple memories box this month where I can write nice memories that I have. So far I have not written anything in because I am not sure about the formatting yet. Should I do it list form, or in boxes?

Lastly for the monthly spread, I have a reminders section and a favorites section! This just allows me to compartmentalize things that I think about or learn about during the month.


My week is spread over two pages, each day under a whole line (16 dots wide). I decided to split Saturday and Sunday in one line to save space and to maintain the design of the weekly spread. Having my week spread out this way has been working for me so far and I really like it. I feel more organized, and much more driven to complete things that need to get done. It has definitely been helping me to stay organized and on top of every day tasks! 


Lastly, my favorite pen to use is the Staedtler 0.1 pen as it is super fine and has a nice black pigment - it works well with the paper in this journal. 

I am quite new to bullet journaling, so perhaps I will post in the future about what I have learned using the system and other tips and tricks for a minimal, organized bullet journal!

Thanks so much for reading,
Madison xx


Glamis Castle | what to see in Scotland

Glamis Castle | what to see in Scotland


There are so many castles in Scotland, people often think of Scotland as the castle capital of the world! Some are in ruins, some are restored, and others, like Glamis, have been maintained over the years. Glamis is my favorite castle because it is in the area which my family is from, and it is extremely beautiful! There are the most wonderful gardens, several of them, which are home to many different types of pretty plants. There is a lovely forest surrounding the castle grounds with the cutest little creek running through, and there are also many nice animals that live on the property! A visit to Glamis castle is like taking a step back in time.


Unfortunately, there is a strict no photo policy inside the castle, but believe me, it is totally worth it to see all of the wonderful rooms and decorations that they have inside. Each room is in a similar state to how it would have been during the castles prime, and it really does feel like you are walking through someones home. All of the furniture remains, as well as some impressive decor pieces and beautiful paintings. 

There are many tours throughout the day which lead you through the castle and give you exciting information about the history of the castle and its inhabitants. Glamis castle is extremely interesting and has a detailed history which is entertaining to learn about! Their website is linked HERE so you can get a better feel for the tours they do, as well as a sneak peek of some images of the interior of the castle! 


This is the famous view of Glamis Castle - its rich red tone against the vibrant green grass. When I was much younger, around 12 years old, we visited Glamis Castle to attend the Highland Games. I remember it being the most wonderful event in such an enchanting setting! I'm not sure if they host highland games here anymore, but if they do, I highly recommend visiting the castle then, as it is so nice to experience the castle grounds when they are buzzing with local culture and traditions.

There are several different gardens on the Castle grounds which are accompanied by and connected with different 'walks'. There is the Italian Garden Walk, the Nature Trail Walk, the Pinetum Walk, and the River Dean Walk. The gardens showcase different types of plants and different styles of architecture and design demonstrating the different styles and fashions in history.

(Italian Garden)

(Italian Garden)

(Italian Garden)

(Italian Garden)

(Italian Garden)

(Italian Garden)

(River Dean)

(Bridge on the River Dean Walk)

(Walled Garden)

(Walled Garden)


(Walled Garden)

(Walled Garden)

(Walled Garden)

(Walled Garden)

The Italian Garden is a place to showcase the impressive landscaping which compliments the historic fashion of the time. There are sculpted hedges, exotic plants, and other beautiful features like fountains, and statues. 

The Walled Garden is a place where many fruits and other food would have been grown to feed the inhabitants of the Castle. This garden is extremely beautiful, enclosed by a tall stone wall and several large gates. This garden is filled with beautiful flowering plants, a fountain, fruit trees, and the most beautiful greenhouse. 

Walking through the castle grounds are one of the best parts about visiting Glamis Castle. There are plenty of beautiful sights to see and the walking paths are well kept.  


Glamis Castle is a gem worthy of being explored!

Thanks so much for reading,
Madison xx

Cinnamon Spread

Cinnamon Spread


When I was growing up, my sister and I spent a lot of time at my grandparents house. I have several 'taste memories' from our many meals there, but one that stands out is cinnamon spread on toast! We were never allowed to have that at home, so it was such a treat at grandmas house. 💓 She bought it in a small tub, it was called 'cinnamon spread' by the brand Imperial. We had it for breakfast after sleepovers, or as a sweet afternoon snack. I honestly loved it so so so much!

My grandma passed away a few years ago now and I completely forgot about the delicious treat we used to have. I was reminded a few days ago when I was recipe testing for cinnamon buns (coming soon). I was playing around with the filling for the buns and realized that what I had created tasted EXACTLY like the cinnamon spread from my younger days - instant taste memory!


Directions

Melt the butter in a medium sized bowl, then add the sugar. Allow the sugar to dissolve into the warm butter and then add the cinnamon. Stir well and set aside - the mixture should thicken slightly.

Next take half a cup of fresh cream and whip it until stiff peaks form. Once the cinnamon mixture has become somewhat 'gelatinous', go ahead and fold in the whipped cream. I prefer to leave the whipped cream unsweetened because of the sugar in the cinnamon mix, if you want to use sweetened whipped cream, feel free - it will be extra sweet! 

Place the cinnamon spread in the fridge for at least an hour to let it firm up, and then it is ready to eat! 

It is important to keep this spread refrigerated as it can soften at room temperature. Like I said before, the spread is great on toast, but it is also really delicious with apples! 


Let me know if you re-create this recipe & be sure to come back for more!

Thanks for reading,
Madison xx